How To Make Cake Pops: A Step
Have any leftover birthday cake? Or did you bake a cake and it turned out a little dry? So what do you do with dry cake? Turn it into cake pops of course! This how to make cake pops tutorial has really easy steps to turn any cake into cake pops. Kids will love helping to make these but the best part is enjoying them as a fun treat!
Whats The Trick To Making Cake Pops
You can use any flavor cake mix: chocolate, vanilla, red velvet, yellow, etc. Be sure to check your cake mix to ensure you have whatever other cake ingredients the mix recommends for baking.
You will also need one container of store-bought frosting. I like to use anything with a simple texture like vanilla, chocolate, or strawberry.
I would avoid things like German chocolate .
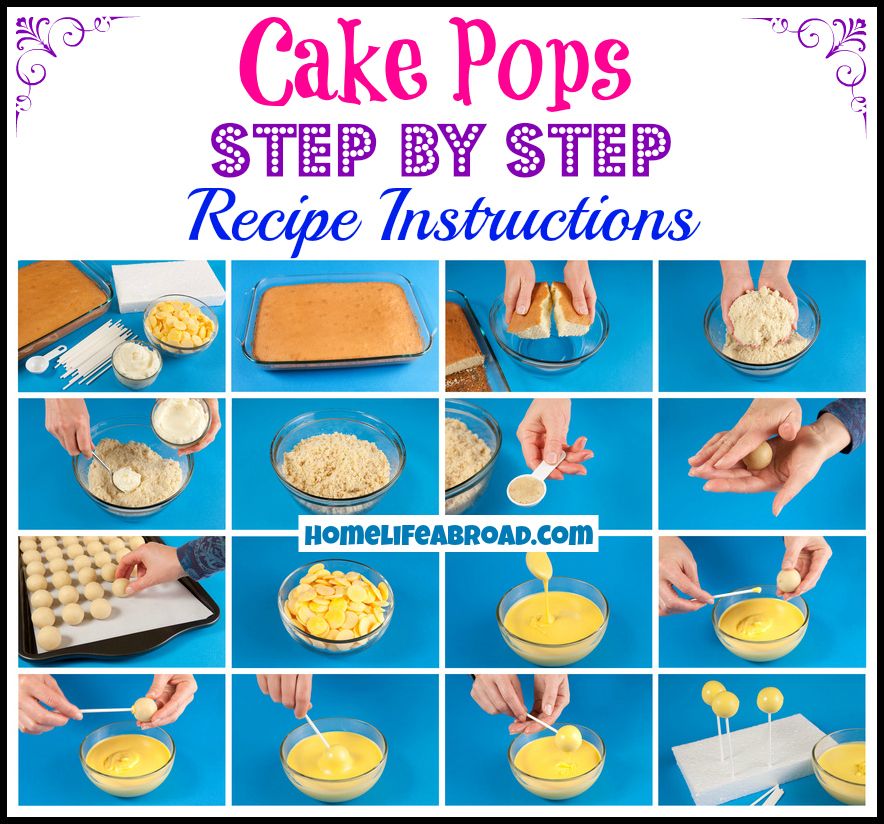
1. Bake the cake according to the package instructions and allow to fully cool.
2. Spoon the baked cake into a large mixing bowl. Add 2/3 of the container of frosting.
In my experience, using the full container makes the cake pops a bit too soft and harder to work with once we dip them in chocolate. But, this is how you get cake pops to stick togetherwith frosting.
3. Use your hands to mix together the frosting and cake. The cake pop batter is going to be pretty soft, but moldable.
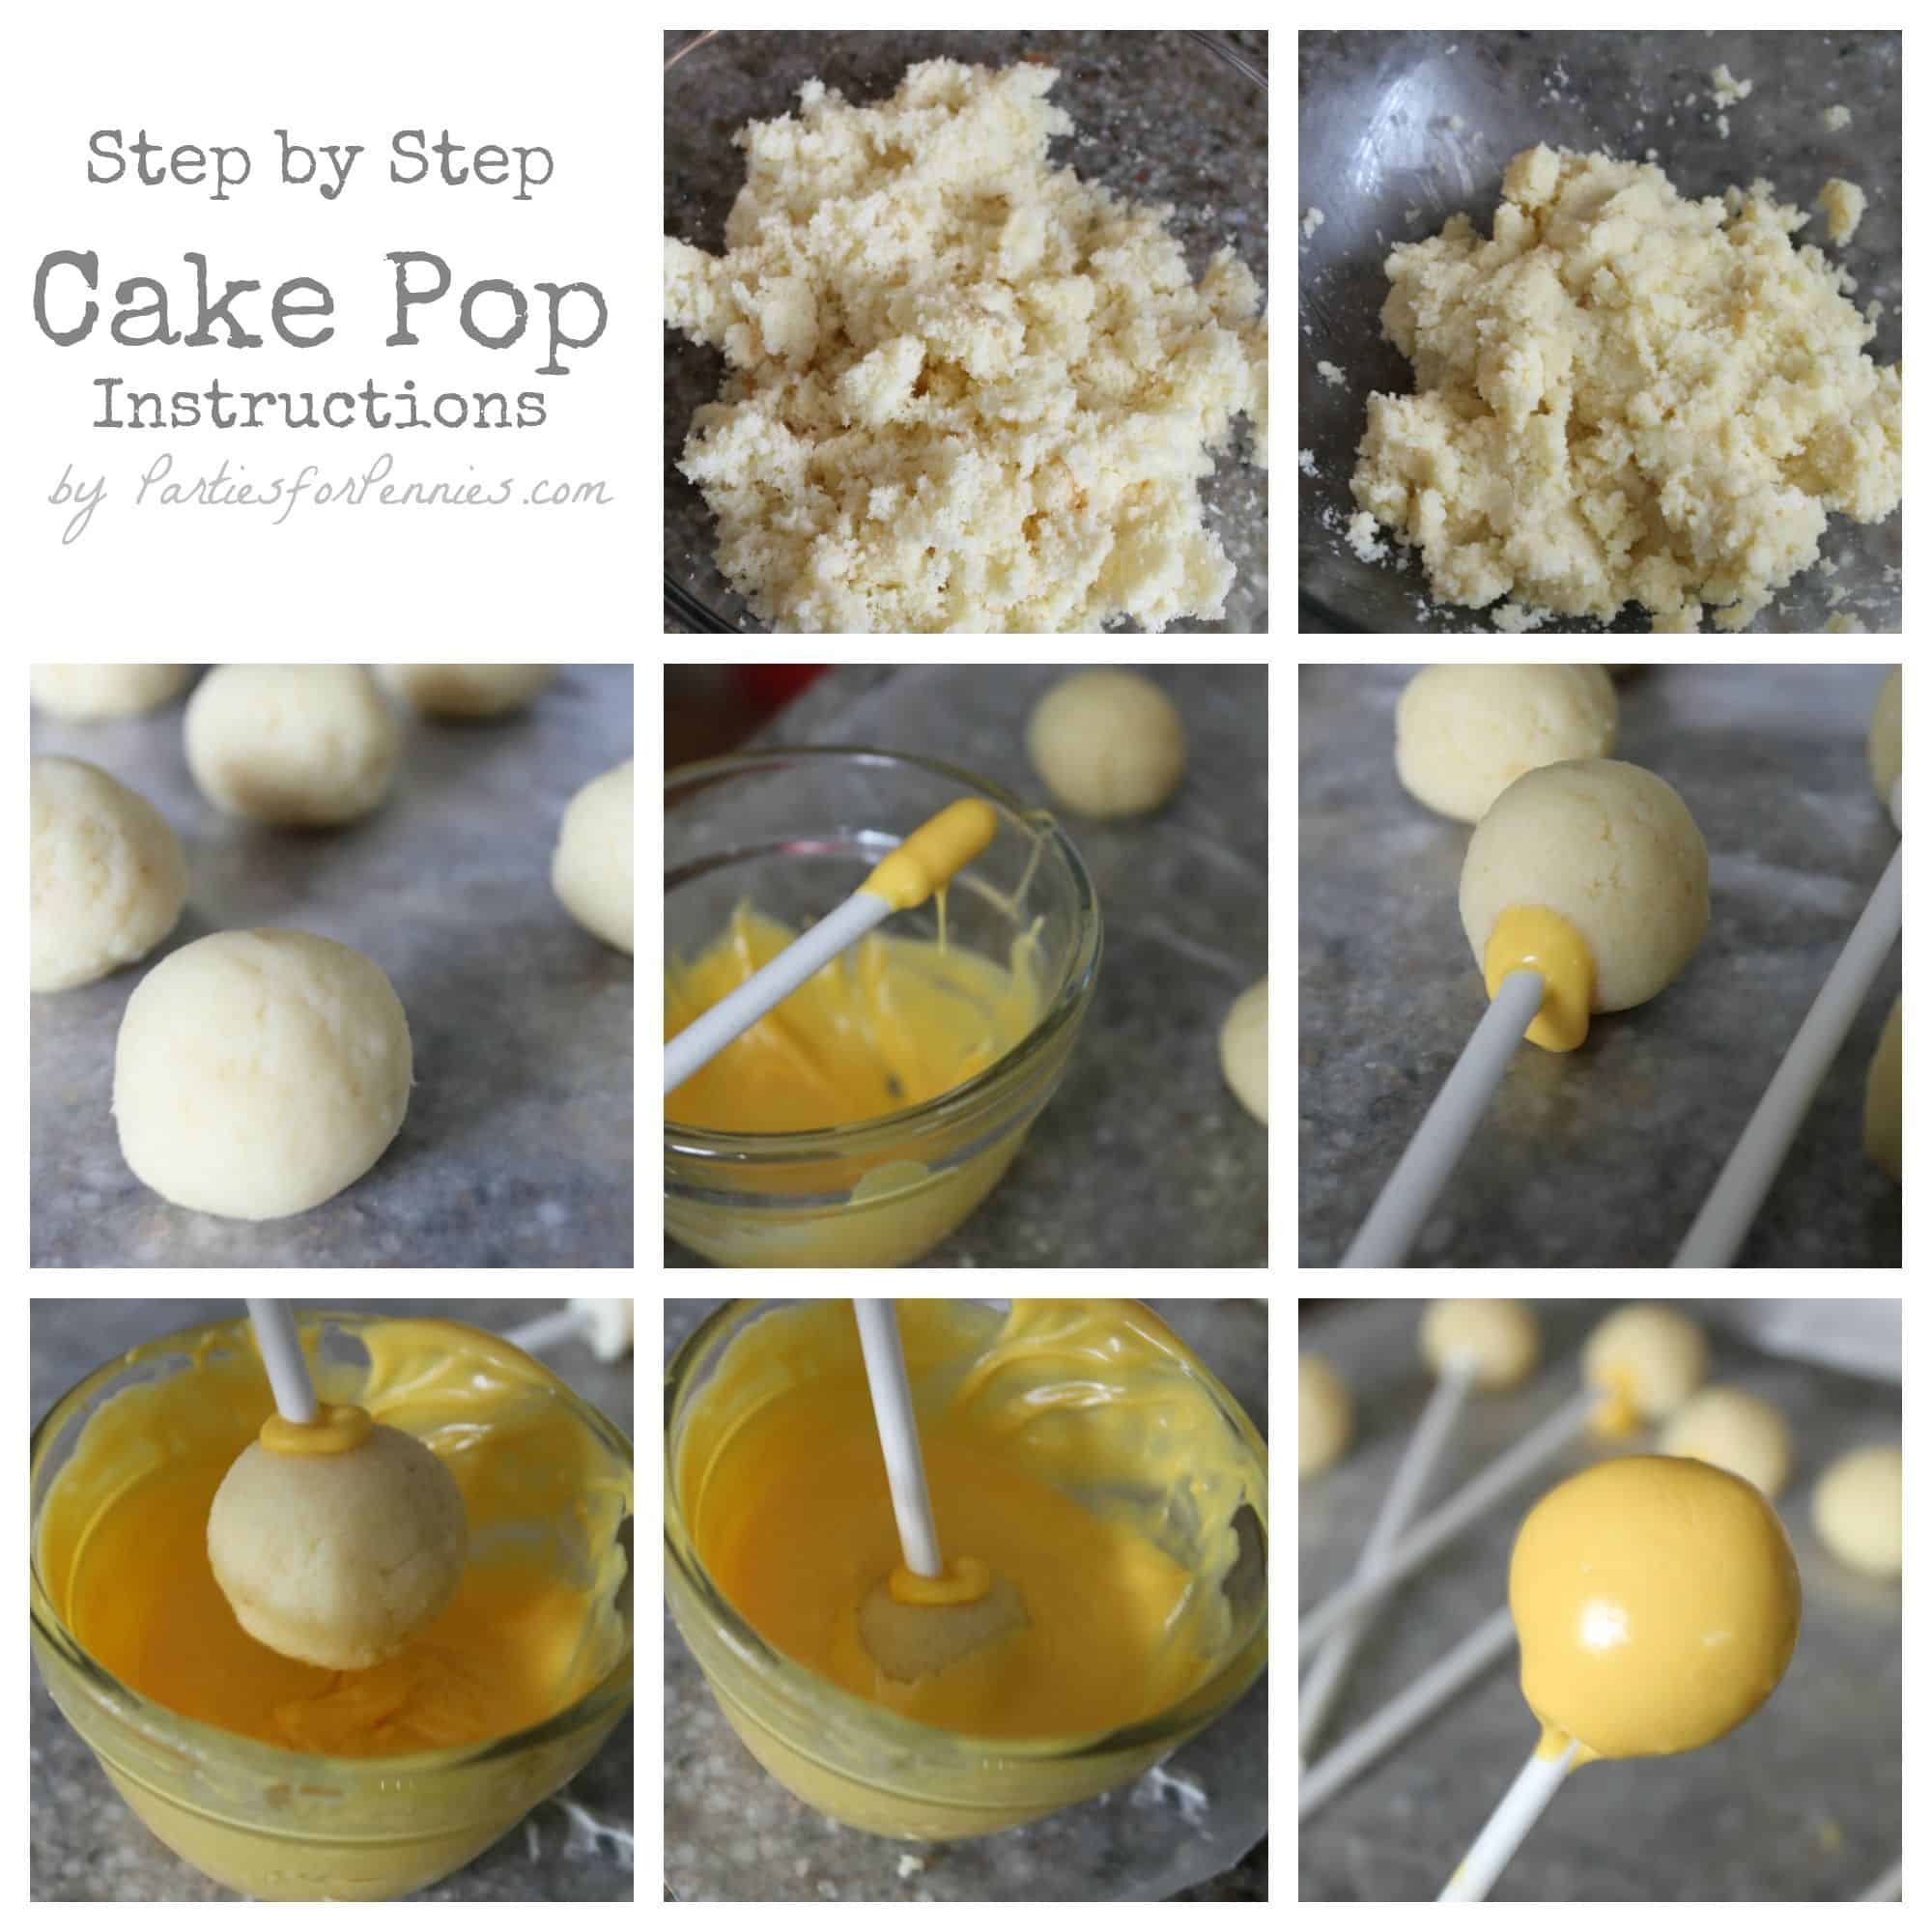
4. Form your cake pop batter into small balls . You dont want them to be too big, just so they easily fit in the palm of your hand.
Once you have formed all your pops , put them in the refrigerator for 1-2 hours or the freezer for half an hour.
5. Get your candy melts and any other supplies ready like cake pop sticks, sprinkles or other edible decorations you want to use.
I think candy melts work best for cake pops, but you can also use chocolate chips instead.
The mixture will be a little thicker and slightly harder to work with . And, the shell around the cake pops will be thicker once the chocolate sets.
Vanilla Cake Pops From Scratch
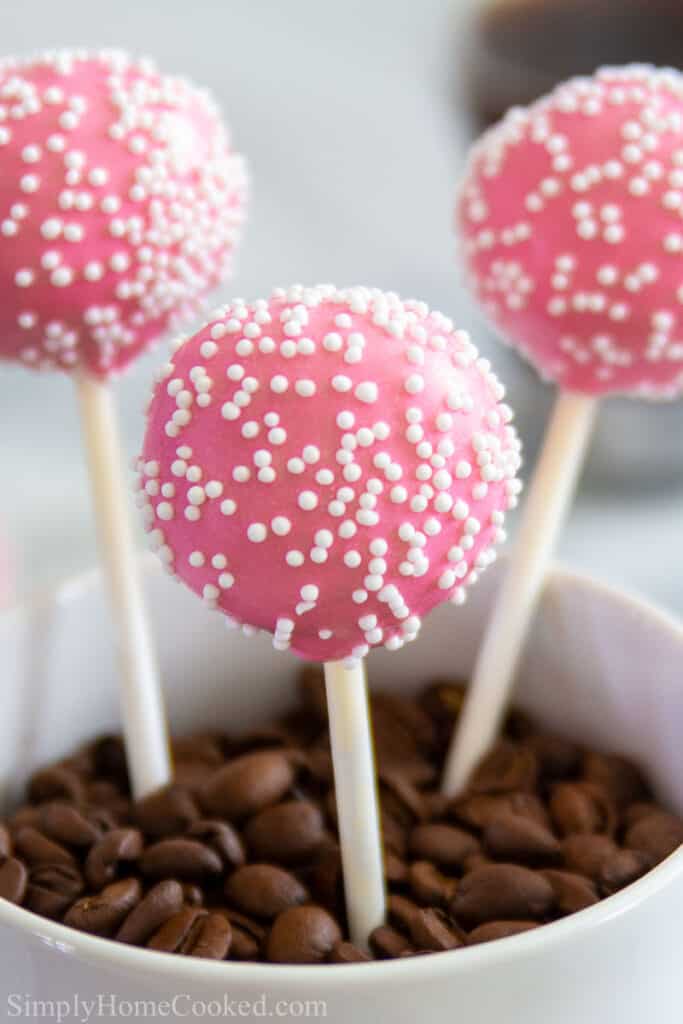
A ball of vanilla cake crumbs and frosting, with a white chocolate coating and topped with sprinkles… I am talking about none other than the cutest bite-sized treat — vanilla cake pops from scratch. These bites of heaven are thankfully actually so simple and easy to make, which makes them the perfect treat to serve at your next event.
I have been spending the last month planning and preparing for my son, Kai’s, first birthday. Seriously, how are we even at this point right now? So I have been perfecting my cake pop recipe specifically for this party. After a few trial and errors, we have found the winner!
This recipe will yield cake pops with the perfect ratio of cake crumbs to frosting. I challenge you to have just one!
Recommended Reading: Dairy Queen Chocolate Ice Cream Cake
What Can You Use To Stick Cake Pops In To Dry
- Fill a dish that is about 2/3 the height of your lollipop sticks with sugar or sand. Stick the sticks securely into the mix, making sure the tacky balls dont touch each other. You can also use pieces of candy or dried beans.
- Flip over an egg carton and puncture holes through each dome.
- Depending on the size of the holes of your colander, this can also be flipped over and work. The holes just need to be the correct size of the lollipop sticks.
- Use a piece of styrofoam block or floral foam- just make sure one side sits flat. Clearly a ball shape would go rolling away with your pops!
Bonus Step: Quickly Refrigerate Your Cake Pops

While this step is not needed, I wanted to include it because popping your just-dipped cake pops in the refrigerator for a few minutes not only helps them dry quicker but also gives them a nice sheen. We typically dip several together and then refrigerate the stand for 3 minutes. If you are planning on this, make sure to get your cake pops in the fridge before the chocolate melt dries.
Ok, so thats it! Ten steps to the perfect cake pop! You are now equipped with more than enough knowledge to make your own cake pops. If you are ever stuck, though, reach out and well see if we can help! Happy cake popping!
Disclaimer: As an Amazon Associate I earn from qualifying purchases.
Recommended Reading: Ben And Jerry’s Tie Dye Cake
Visual Learner Watch Me Make These Cake Pops From Start To Finish
I thought I HATED cake pops. I made them for a baby shower a few years ago, and they were a pain in the hind parts!
All that daggum freezing and refreezing, dipping, twirling, decorating, and ugh that texture!! Ewww!!
It was soggy, grainy, and tasted like someone had chewed it up already. My hubby sat quietly, ate the whole thing, and calmly said: you dont have to make these again, please.
I seriously did not see what all the cake pop hype was about, but I kept getting requests to PLEASE DO A CAKE POP TUTORIAL!. I cant seem to say no to you guys, so I got back in the kitchen to figure these things out. Something had to give!
How To Get Smooth Balls
- Roll again before dipping. Just before dipping them into chocolate, use your hands to gently re-roll the cake balls. Re-rolling will smooth out the sides and help make the cake balls more secure!
- Use candy melts, wafers, or bark! For the best results use candy melts, melting wafers or almond bark! These ingredients were MADE for melting and dipping!
- Thin the coating! Thin your candy melts with a teaspoon of shortening or coconut oil to create the perfect consistency! If the candy coating is too thick it WILL get clumpy!
- Dip, dont swirl! Gently dip the cake ball into the chocolate do not stir it! If you twirl or swirl the ball in the chocolate it will look misshapen, and not smoothly circular!
- Remove excess coating! After dipping, gently tap your fork against the side of the bowl or glass to remove all excess candy this will help create the perfect layer of smooth chocolate coating!
- Keep candy coating warm! Make sure you keep your candy coating warm throughout the entire decorating process! Warm, thin coating is the key to perfectly smooth pop! Tip: If you enjoy making cake pops, you may want to consider looking into a chocolate melting pot or heating pad! Either of those kitchen gadgets will keep your chocolate warm, making the entire process smoother!
Also Check: Nothing But Bundt Cakes Walnut Creek
How To Gift Cake Pops
Homemade cake pops make a fantastic food gift for everyone on your list. Of course, anyone would be thrilled to receive a regular ol’ zip-top bag or storage container filled with cake pops. But you can go the extra mile by wrapping them in decorative cellophane tied with a ribbon, arranging them in a cookie tin filled with colorful shredded paper, or presenting them as a bouquet in a flower pot.
Why Did My Cake Balls Fall Off Their Stick
Dont skip dipping lollipop sticks in the frosting before inserting into the ball. This helps the sticks stay put in the balls as they harden. Not inserting the lollipop stick deep enough will cause them to fall off as well. Finally, make sure your lollipop sticks arent too thin, as you need a thick enough stick to hold the weight of the cake balls. My go-to lollipop sticks are pictured above.
Don’t Miss: Online Cake Delivery In Dallas Texas
Ingredients For Cake Pops Recipe
- Any cake of your choice
- Any frosting of your choice
- Milk or Dark Chocolate Chips – 2 cups
- Vegetable Oil – 2 tbsp
- Sprinkles as needed for decorating
But when you want to make this from scratch. you can use any of my cake recipes and make this…Since i bake quite a bit of cakes, i always have some leftover frosting which i used..So i used them to make this..You can make a batch of buttercream or use store bought ones too..
Box Mix + Homemade Frosting: A Winning Combo
I have been making cake pops for over 12 years and have found that using a boxed cake mix and homemade frosting is the best combination. When I first started out, I used canned frosting, and didnt like the way it incorporated with the cake. It was too mushy, and thats not what we want!
If Im feeling extremely ambitious, Ill make both the cake and the frosting from scratch. If Im short on time, Ill turn to the boxed cake mix. I promise your cake pops will turn out beautiful either way, but I will ALWAYS take the extra few minutes to make frosting from scratch. It truly cant be beat.
Read Also: Banana Bread Out Of Cake Mix
How To Form The Cake Balls
- To form the cake balls, use a cookie scoop of 1 1/4 inch in diameter. Or, a large spoon will also do. Then, round them off with the palms of your hand to form the cake balls.
- Place them on a parchment lined cookie sheet and allow to rest for 20 mins. They will naturally expand while resting so dont skip this step. And will help to avoid cracks in the chocolate once dipped.
- Cover with cling wrap and chill for 4 hours to allow the cake balls to firm up.
Why Is The Candy Coating Cracking

The main culprit of a cracked cake pop coating is due to significant temperature differences in the cake balls. If the cake balls are too cold and the melted candy melt is too hot, the coating will crack as the hot mixture will cause the cake balls to expand and then contract. To prevent this from happening, make sure the coating isnt super hot when you dip your cake into it. Allow your coating to cool for a few minutes before dipping.
You May Like: Nothing Bundt Cakes Grand Prairie Tx
Supplies You Need To Make Cake Pops
For cake balls When making cake balls all you really need is a baked cake made with cake mix, frosting, and candy melts to coat the outside of the balls. You can shape the cake balls with your hands or use a meatballer to get the perfect shape and size each time.
For cake pops you will need the same ingredients here but you need to add cake pop sticks and a styrofoam block to keep the pops upright until they harden.
Cake Pops : Tips And Tricks
- If youve baked too much cake, you can freeze any extra and use it for more pops on another occasion
- When using light-colored baked cake as filling, remove any burnt or darker portions of the cake to prevent unsightly specks in your cake pop mixture
- When rolling the cake balls, do it with gentle motions so that the balls arent pressed too tightly since they usually increase in volumeonce coated and may crack the nice coating
- You can dilute the cake coating if it is too thick with paramount crystals for candy melts or shortening
- Dont use whipped or creamy frosting when making cake pops because the mixture will lose firmness and the balls will not hold together as they should.
Suggested Read: How To Make Tulip Cookies
Also Check: Places That Sell Ice Cream Cakes
Add A Splash Of Color With Gel Food Coloring
If youd like to color the frosting or the cake, I recommend using gel food coloring. Wilton is my go-to brand because I can find it almost anywhere! Insert a clean toothpick into the coloring and then drag it through the cake batter or frosting. If you need more coloring, repeat the process, but use a clean toothpick each time!
Just a little PSA: using liquid food coloring may change the consistency of the frosting, so stick with gel!
An Experts Cake Pop Tips
- Let the cake cool completely before crumbling. If you add frosting to a warm cake, its going to affect the consistency of the frosting.
- Crumble the cake with a stand mixer. Ive done it by hand, and it takes a long time!
- Dont use too much frosting! I already mentioned this earlier, but its worth mentioning again. You want the mixture to hold its shape, but still be a little firm.
- Refrigerate after youve combined the cake and frosting. Itll really firms things up and make it easier to roll into balls. I usually do this overnight, but you could do it in a couple of hours.
- Use candy melt circles for your chocolate coating. I used Ghirardelli in this recipe, but have used Wilton, and even bulk candy melts from Winco. Using regular chocolate will cause the cake pops to melt in your hands.
- Add a tiny bit of shortening to your coating to thin it out a bit. I personally like the consistency of a slightly runnier coating because I can dip the pops faster. Ill melt the chocolate in the microwave in a heatproof bowl in 30 second increments, and then add the shortening in 1/2 teaspoon at a time. Dont use vegetable oil or coconut oil to thin it out. The chocolate wont set up properly. Learn from my mistakes and stick with the shortening.
- Use a cookie scoop to get the ball rolling Literally. Ha! Ill scoop everything out, and then go through and roll the pops. If the pops arent forming while youre rolling them, take a ball, smoosh it together between your hands, and then roll.
You May Like: Nothing Bundt Cakes Palm Desert Ca
Can You Freeze Cake Pops
Yes! You can freeze cake pops. However, it’s best to freeze them uncoated. You can dip the cake balls in the candy melts before you plan to serve them: Arrange the balls on a baking sheet, cover, and freeze for at least three hours or up to overnight. Transfer the now-frozen cake balls to zip-top freezer bags labeled with the date, then lay flat. For added protection, wrap the flattened bags in one layer of foil. Freeze for up to six months.
Thaw in the fridge before coating.
Editorial contributions by Corey Williams
Melting The Candy Wafers
While the cake balls are chilling in the refrigerator, this is a good opportunity to melt your candy wafers to make candy coating. There are many brands of candy wafers please note that all brands and each color within those brands melt into a different consistency. The most commonly found are Wilton. The higher-quality brands are Merckens and Clasen, which you can usually only find in cake/candy/baking specialty supply stores.
You will most likely need to thin out your candy coating. Use only Paramount crystals as this is the only product you can use that will not affect the integrity of the coating. Paramount crystals can be found in cake/candy/baking specialty supply stores and online. As I mentioned in the first section, for beginners, dark brown will be the best color to work with for your first time because its very low maintenance. It melts into an ideal consistency, no matter what brand you buy.
This dipping tutorial really goes more into detail about candy coating usage. Please familiarize yourself as much as you can with the process.
Don’t Miss: I Need A Birthday Cake For Tomorrow
Thinning The Candy Coating
In between the dunking of your cake pops, if your candy coating has started to harden simply return it to the microwave and heat the chocolate in 15 second intervals. As youre running low on candy coating, add more candy melts to your bowl and melt in the microwave again, in 15 second intervals.
Thin with a little bit of vegetable oil only as needed and stir till completely incorporated. I like to use a teaspoon at a time.
Making Cake Pops With Leftover Cake

Using leftover cake to make cake pops is the best!! We dont have leftover cake in my house very often, but when we do, its on and poppin!
That leftover cake turns into cake pops, and then all of a sudden, people are in the mood for cake again! Isnt it funny how you can put something on a stick, and everybody wants it?
When making cake pops with leftover cake, you want to scrape off the frosting first and place it in a bowl.
You definitely wont need all the frosting. Crumble the cake up and then add in the frosting a little at a time until the cake can hold its shape once formed into a tight ball.
These cake pops are what I consider cake pop perfection!!! They are the best cake pops Ive ever had. The texture is fluffy AND moist, and it was nowhere near as messy and time-consuming as my first attempts at making cake pops.
Now, if youre looking for a tutorial on how to decorate cake popsugh, Im not the girl for the job!! Sprinkles is as good as it gets over here : )
Even without fancy decoration, these cake pops can still make a pretty cute, cheap, and festive gift idea! Let your imagination run wild!
Also Check: How To Teach A Cake Decorating Class